
Your position: Home
/
Installation Guide
Installation Guide
1. Review Your package

-
1 x Igniter
-
1 x Screw
-
1 x Gasket
-
1 x Fixing Ring
-
1 x Installation tool
-
1 x Fuse
2. Safety First

Disconnect all power sources - unplug your grill and take out the battery if applicable.
Allow the grill to cool down if it has been in use.
3. Unscrew the firepot
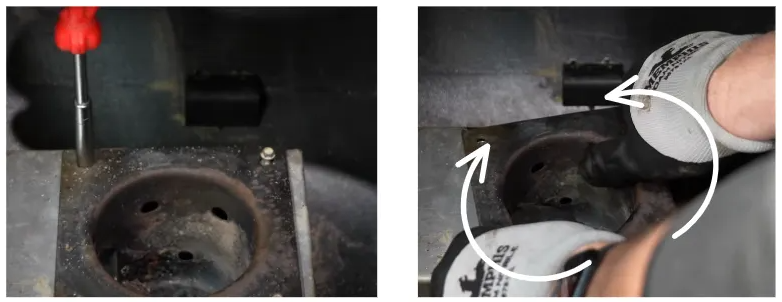
Unscrew the firepot & make sure you keep the screws in a safe place!
Twist the firepot left and right first to loosen it up.
4. Take out the Firepot
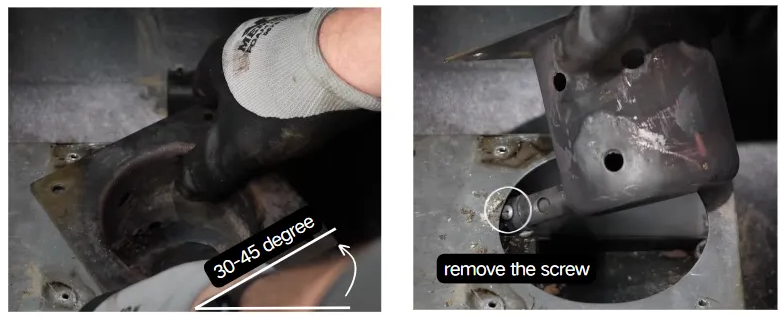
Carefully twist the firepot left and right, and then turn it 30-45 degrees counterclockwise before pulling it out.
Detach the screw that held the old ignition rod in place.
5. Put on the Fixing Ring and the Gasket to the new Rapid Igniter
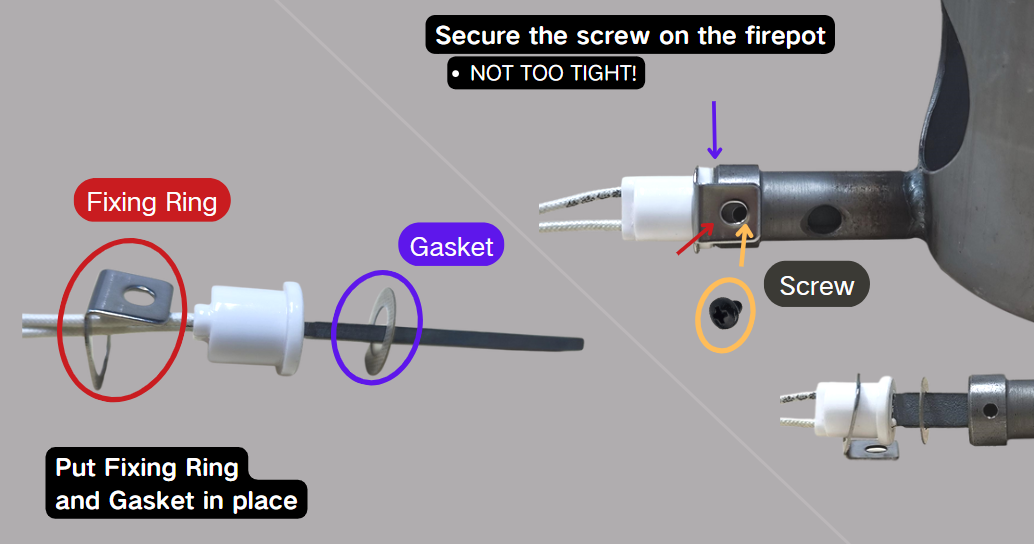
Position the "fixing ring" and "gasket" as depicted in the image above, and fasten the screw to the firepot by passing it through the fixing ring. Be cautious not to over-tighten the screw – allow a small gap for thermal expansion and contraction.
Put the firepot back in place and reinsert the screws.
6. Connect the installation wire to the new and old igniters

First, connect one end of the installation wire to the Molex connector of the new Rapid igniter. Then, connect the other end of the installation wire to the old ignition rod and secured it with a tape
7. Remove the plate underneath the hopper

- Remove the plate underneath the hopper;
- Clip ties holding wires;
8. Pull the igniter wires back through the burn tube into the hopper

Pull the igniter wires back through the burn tube into the hopper, and the old igniter will come out.
Continue pulling the installation wire, and the Molex connector of the new Rapid igniter will emerge as well.
8. Disconnect the old igniter and connect the new igniter

First, disconnect the old igniter (might take a strong pull);
Then connect the new igniter.
9. Almost done - Test it first and then you can rock n roll!
After confirming that the new Rapid igniter is functioning properly, unplug the power, neatly arrange the wires within the carriage, and reinstall the plate.
Depending on your grill model, the new ignition rod may be perfectly aligned with the end of the firepot ignition tube or it may protrude slightly. Regardless, this does not impact the ignition process.
10. Congratulations! You can now enjoy the advantages of the advanced silicon nitride rapid ignition system!
- Experience ultra-fast ignition, as quick as 90 seconds, allowing you to start cooking sooner!
- Reduced white smoke during the ignition process.
- Exceptional durability with 100,000 ignition cycles and a product lifespan of 7-10 years.
- Benefit from a 3-year manufacturer's warranty, starting from the date of purchase!


